Twitch OBS Mac Settings - An Autistic-friendly Guide
In 2025, I upgraded my M2 MacBook Air to an M4 Max Mac Studio. I set up my dual-PC studio: a gaming & streaming PC with an RTX 4070 Ti and a 5950X CPU and the Mac Studio for video editing and very casual music production. I quickly realized that transferring files between the devices wasn’t convenient, as large video files aren’t friendly to frequent transfers.
I decided to change that. I moved my streaming to my Mac Studio, and have optimized my settings to maintain no frame drops and the highest-quality recordings. The goal of this post is not to convince anyone that a Mac is the way to go—an NVIDIA-based PC would be much better for streaming. But I want to edit and stream on the same PC, and I don’t like the editing software available to PCs. Maybe I’m autistic, but I just hate it when the software doesn’t do exactly what I want to do in the precise way I want to do it, and everything I tested on PC had some of what I wanted, but some of what I didn’t want. Ultimately, it was endless frustration, rotating through softwares, and Adobe's ridiculous cancellation fee policy.
That preamble went on and got a little off topic, but the takeaway is maybe you’re also using a Mac and looking to optimize your OBS settings. Let’s do this together, going through each item one-by-one until we know what everything does—though to tell the truth, I don't know what B-frames actually are. If you’re just chasing the best settings, I’ve put them all here, with accordions to expand and see the rationale behind each decision.
We’re going to focus on the four main tabs for streaming: Stream, Output, Audio, and Video.
Settings > Stream
The MacOS version of OBS now features Twitch Enhanced Broadcasting, simplifying settings and letting Twitch take the reins of your stream, including multiple encode resolutions and bitrates. If you are just starting, your access to transcodes is severely limited, so assuming you have the internet bandwidth to support it, Twitch Enhanced Broadcast is almost always the best option to pick.
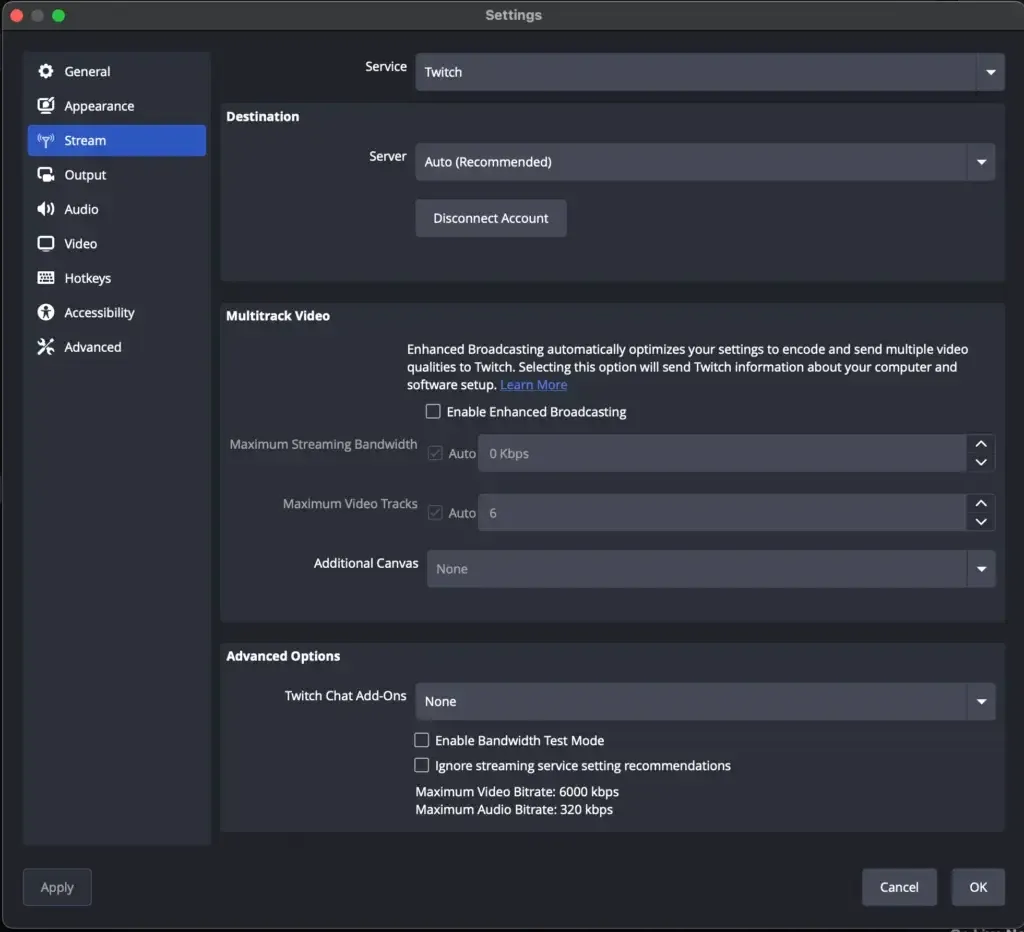
Destination: Auto
I keep my server setting on Auto, but you’re not here because you want to be told to set it to auto and forget it. Auto will choose the best server for you based on connection strength, ping, and expected quality of the connection. There is a great tool called TwitchTest, that does not work on Mac, but enables you to check all nearby Twitch servers from a Windows PC so you can manually select the best server. I keep it on auto because if there’s ever a problem with the San Jose server, Auto will redirect you to the next best. If you select San Jose, you’ll use it even if it’s less optimal at that time.I have read that for some users, Auto selects worse servers than they expect. I haven't had such problems, but I pay close attention to my performance while I stream.
Multitrack Video: Auto
Twitch Enhanced Broadcasting enables all users to have transcodes—transcoding is a term that means multiple resolution options—because you encode each resolution yourself, on your machine. In my case, I have five resolutions available when I enable Enhanced Broadcasting: 1440p60, 1080p60, 720p60, 480p30, and 360p30. If you stream at 1080p60 without Enhanced Broadcasting, Twitch does not recommend exceeding 6000 bitrate, but the screenshot above shows that my 1080p stream is encoding at 7500 bitrate. Let’s be honest—that’s nowhere near where it should be, but it’s improvement. One interesting thing to note, and one of the reasons why I earlier said Enhanced Broadcasting is “almost always” best, is because of that 720p, running at 3500 bitrate. If you are streaming in 720p, 60 fps, 4500 is Twitch’s recommendation, meaning you could stream at higher quality if you have a slower upload or viewers who prefer to use 720p over all other resolutions.If you have an upload speed of greater than 50 Mbps and are hard wired to your router/modem, you probably don’t need to worry about Maximum Streaming Bandwidth. There are a lot of best practice guides out there that say don’t exceed 50%, 60%, or 80% of your upload for your stream. I’m firmly in the 50% category, but only if you control all other devices on your network. If you live in a home with other internet users, there are so many things that can consume upload bandwidth, and if it slows down you’re going to drop frames and the stream will have visible hiccups. If you share your internet with other people, my opinion is not to go above 25% of maximum internet speed. So if you have 100 Mbps, don’t stream more than 25 Mbps total.
Maximum Video Tracks; Auto, unless multistreaming
Enhanced Broadcasting on auto will always use create five encodes. This is even true if you enable vertical streaming on Twitch. When I tested vertical streaming (not pictured anywhere here as my screenshots are old), it did three landscape and two vertical encodes.The biggest challenge, however, comes when you try to introduce multi-streaming. You want to send your stream to YouTube, Kick, TikTok, and Facebook gaming—each of those might be another encoding session, and you quickly realize the chip can’t handle all of that. NVIDIA makes it easy on RTX cards by putting a hard limit of 12 total encoding sessions (it used to be 8, and 5 before that). Macs don’t have a hard limit—you’re left testing the limits until you overdo it. It becomes even more complicated if you record in ProRes in OBS.
The limit of my M4 Max Mac Studio (base model) is the five tracks Twitch does, then recording and replay buffer. Recording and replay buffer need to be set to ProRes or I get encoder overload errors. Macs are optimized for ProRes, so even though the resolution is so much higher, they make easy work of encoding in ProRes. Just make sure if you record to an external hard drive, it has USB4 or TB3+ support—I made that mistake early on.
If you are going to multistream to another source, the easiest thing to do is reduce the maximum video tracks by one per additional source—so if your Auto setting does 5, you lower it to 4 and then add your other source. Do keep in mind that removing a track will probably remove your lowest resolution setting, so 360p for me, and adding a 1080p stream might cause encoder overloads. It’s very touchy, so do tests and watch it carefully, and remove another track if needed.
Additional Canvas: None
Additional canvas appears to be an upcoming vertical canvas option for Twitch—the screenshot above also specifies “landscape” feeds, suggesting “portrait” or “vertical” is coming eventually. For now, though, it seems OBS hasn’t added any additional canvas options.*December 25, 2025 edit: Additional Canvas now works with Aitum and StreamElements (possibly others, but I’ve only tested those) to offer multi canvas streaming for the new vertical beta on Twitch. I don’t currently have access to test it, but the mystery is at least solved now.
*August 17, 2026 edit/update: Vertical streaming sucks. As mentioned above, it cuts into your total number of encodes, so your landscape users have less options to choose from. I shouldn't say it sucks. That's not nice. It's not for me. I don't think the sacrifice to landscape is worth it. It also doesn't display correctly in Stream Manager, and you know how I feel about things not working correctly.
Advanced Options
In the advanced options, you can enable BetterTTV and/or FrankerFaceZ. I don’t use either of these, but I believe they are related to emotes and enhancements.Enable Bandwidth Test Mode should be unchecked, unless you are running a stream test. Ignore streaming service setting recommendations should be unchecked, unless you are forcing 8000 bitrate on a 1080p stream. This will generate warnings in Twitch Inspector and the Creator Dashboard, and may lead to unstable streams. Still, people make the choice to do it.
Settings > Output
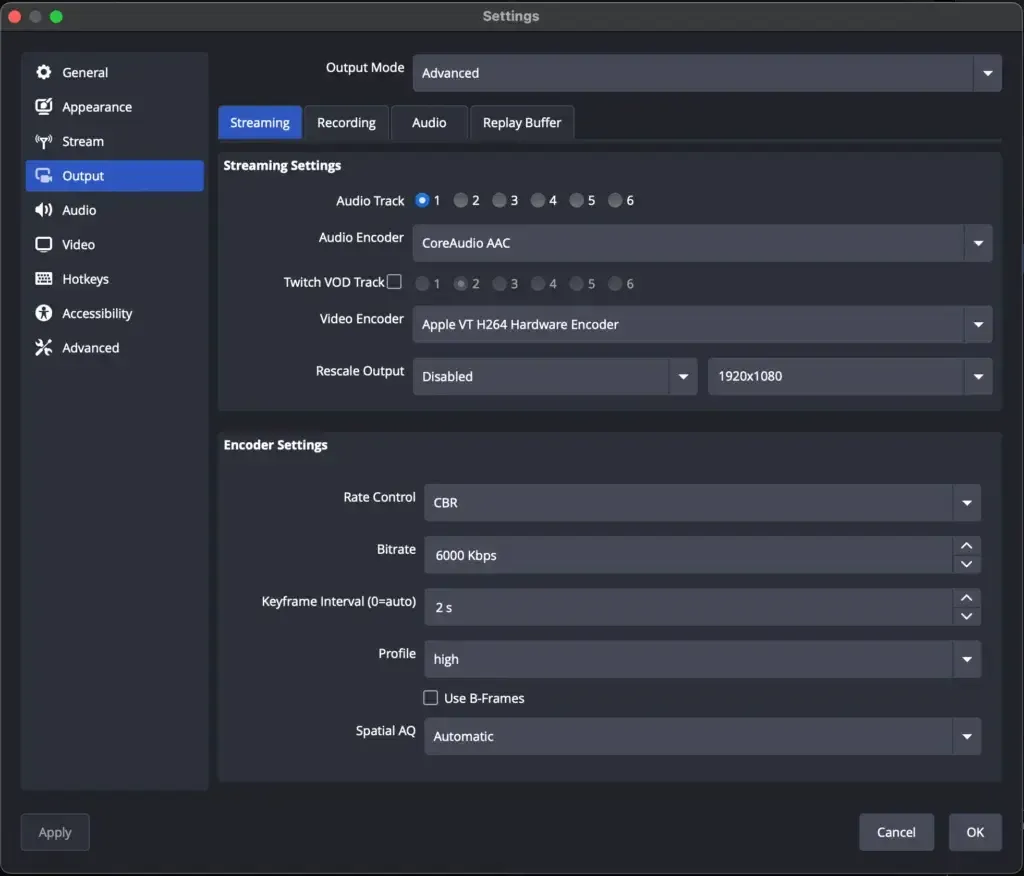
Audio Track: 1; Twitch VOD Track: Unchecked
The only two settings available to Twitch Enhanced Broadcast users are Audio Track and Twitch VOD Track. In most cases, you’ll use track 1 for Audio Track, and you’ll leave Twitch VOD Track unchecked. This changes if you are playing copyrighted music on your stream. If you have copyrighted music playing, you would set the music’s audio source to track 1, and uncheck it from track 2, then set Twitch VOD Track to track 2, which will provide your VODs a music-free recording that will not earn you a copyright strike or automatic VOD muting later. In my experience, copyrighted music is rarely worth the hassle, and it’s better to simply play royalty free music or not have music at all.Audio Encoder: CoreAudio AAC
If you’re streaming on a Mac, CoreAudio is supposed to be higher quality than FFmpeg, which will be your two Audio Encoder options. I have never tested CoreAudio, and now that I’m on Twitch Enhanced Broadcasting, I can’t choose—but it might be worthwhile to try it first and if everything sounds good, keep it. Otherwise, FFmpeg is the default and will work without issue.Video Encoder: Apple VT H264, Hardware Encoder
Your Video Encoder should be Apple VT H264 Hardware Encoder. Your other options will include Apple VT H264 Software Encoder and x264, but the Hardware encoder is what will be using Apple’s dedicated encoder chips, meaning better efficiency and less frame drops. In theory, the Software Encoder or x264 could get you a better quality picture, but I haven’t seen enough evidence to consider anything other than hardware encoding at this time.Rescale Output: Variable
What you set Rescale Output to will depend on your Output settings on the Video tab. If your output is 1080p and you want to stream at 1080p, you can disable rescaling and ignore this line. If your output is 4k or 1440p and you want to stream at 1080p or 720p, set the Rescale setting to Lanczos (highest quality) and the resolution to your desired resolution.Typically, the Video tab is the better place to apply resolution scaling, but if you want to record at a higher resolution than you stream, you have to set the Output higher than you might stream. I do not recommend scaling both, however. If you record at 1080p but stream at 720p, your canvas should also be 1080p. We will cover this on the Video tab section as well.
Rate Control: CBR
Twitch recommends all streams send CBR, or constant bitrate. You’ll also see ABR (adaptive bitrate) and CRF (constant rate factor), but these are not relevant to Twitch.Bitrate: Variable
Your bitrate should be set based on these guidelines from Twitch. For 1080p, 60 FPS, the recommendation is 6000 bitrate. For 720p, 60 FPS, Twitch recommends 4500 bitrate. You can exceed this limit, or stream in alternate resolutions—like 900p or 936p, 6000 bitrate to be a nice balance between screen size and quality.Twitch offers better high-end bitrates through Twitch Enhanced Broadcasting. 1440p will default to 9000 bitrate, but HEVC instead of H264—better compression and better looking video. It will also do 1080p at 7500 bitrate with no errors, but the sacrifice is the previously mentioned 720p down to 3500 bitrate.
Keyframe Interval: 2 s
It is vital to change Keyframe Interval to 2, if it’s not already set. Twitch requires a keyframe interval of 2, and leaving it at 0, which is auto, does not always set it correctly in the stream. I’ve never really sought to understand keyframe interval because it’s always one setting that you don’t change—but my simple understanding is that every 2 seconds, the stream makes sure to capture the full screen of your stream, even parts that haven’t moved or changed colours. When a spot on the screen hasn’t changed colours, the system won’t update it for every single frame. Instead, it will leave it there and only update the areas that have changed. A keyframe interval guarantees that every 2 seconds, those areas that haven’t changed will still be updated.Profile: high
In most cases, you should set your Profile to high and ignore it forever. High provides the best picture quality and has wide support across many devices. There are some older devices that don’t support the technological advances the high profile offers, and in that case main is considered an appropriate fallback. But unless you have a large audience of people on old devices, it should always be set to high.Use B-frames: Unchecked
On Mac OBS, B-Frames is a checkbox, while on Windows OBS, there are more options, including being able to select how many B-Frames you want. I leave B-Frames unchecked, but I also push my Mac to the limit of what it can do, and B-Frames use resources I don’t have. It improves image quality and might be worth testing if you aren’t using Enhanced Broadcasting. I did use B-Frames on PC, though I couldn’t tell you if they actually helped.Spatial AQ: Automatic
Spatial AQ is another one of those confusing options that is supposed to help performance, but may or may not actually do anything. I leave mine at automatic and haven’t had a problem yet. This is one of a few where I actually don't know what it does or why you would want it on or off, but since I haven't had any problems where the solution has been Spatial AQ, I'm comfortable enough in my ignorance to leave it alone.Settings: Audio
There’s not much to say about the audio tab, as I find it better to manage audio through Advanced Audio Properties.
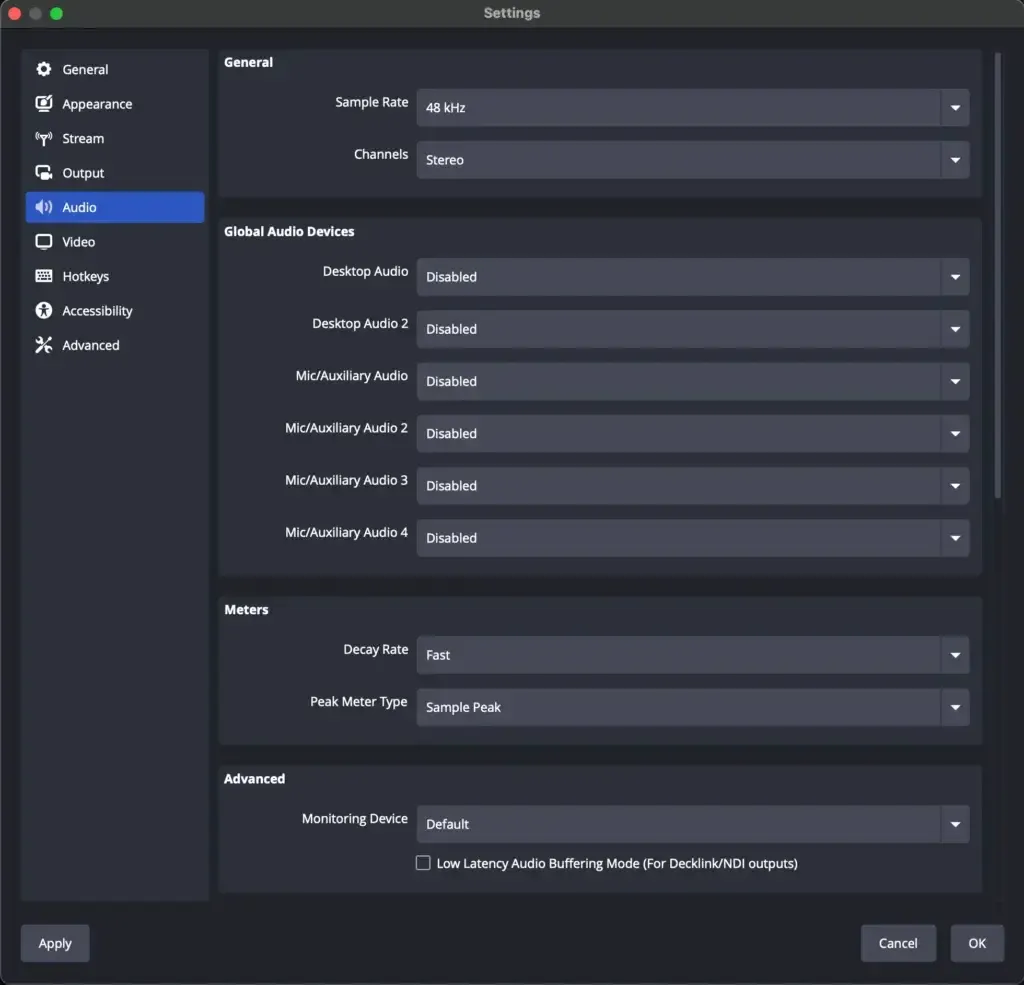
Sample Rate: 48 khz
Do make sure your sample rate is set to 48 kHz, which will maximize compatibility with audio equipment. Most of what I use is Elgato, and all of it is 48 kHz by default. If you have one source at 44.1, it can cause audio issues.This is a good opportunity to check and make sure that any audio that interfaces with OBS is set to 48 kHz.
Channels: Stereo
Twitch only supports mono and stereo audio currently. If you send a 5.1 or 7.1 signal, it gets downmixed to stereo and won’t sound right.Global Audio Devices: All Disabled
I disable everything. As mentioned above, I do all my audio settings in Advanced Audio Properties, and disabling everything globally allows me to have complete control over everything. You won’t hear random Discord messages during my stream.One of my main justifications for this, is maybe I have three different microphones connected to my PC. I have my SM7B, my headset microphone, and Wave Link Microphone FX. If my microphone bar is flashing in OBS, I might not realize that it’s actually changed my default input device to my headset mic. Windows is very guilty of this, but my learning on Windows leads me to say just disable it all and add the specific microphone you want—then you know it’s always set up properly.
I say this realizing that you can select a specific input in the Mic/Auxilliary Audio. I still prefer to control everything in one panel, and Advanced Audio Properties gives me that.
Decay Rate: Fast
The meters section controls the Audio Mixer window. The Decay Rate adjusts how quickly the bars drain when audio stops—like when you stop talking. Fast is the default, and I haven’t seen any reason to change that.Peak Meter Type: Sample Peak
Your options here are Sample Peak and True Peak. True Peak extends the green bar, moves the Yellow bar higher up, and shrinks the Red bar. This can be valuable to understand when your microphone will actually peak, or cause that static blast in your viewers ears.I like to use Sample Peak, because I aim to have all of my audio—game, alerts, and any audio effects, never go above the start of the Yellow bar (-20 dB), while my voice is allowed to go up to about -8 dB—just a smidge into the Red bar, before my limiter kicks in.
When True Peak also uses more CPU, I don’t see any value in re-training myself.
Sample Peak easy rules: mic just kisses red, everything else just kisses yellow.
Monitoring Device: Default
If you have any audio monitoring turned on—so alerts, capture cards, etc, this will allow you to override the default setting. Maybe you always want your monitoring to go to your speakers, but you want your game sound in your headset—this is how you would achieve that.I leave mine at Default, which means when I change the primary audio device for my Mac, my monitoring comes with it.
Settings > Video
We’re saving the best for last, and although it’s short, it’s got some very important stuff. There are only four options in here, but it’s important to get them right.
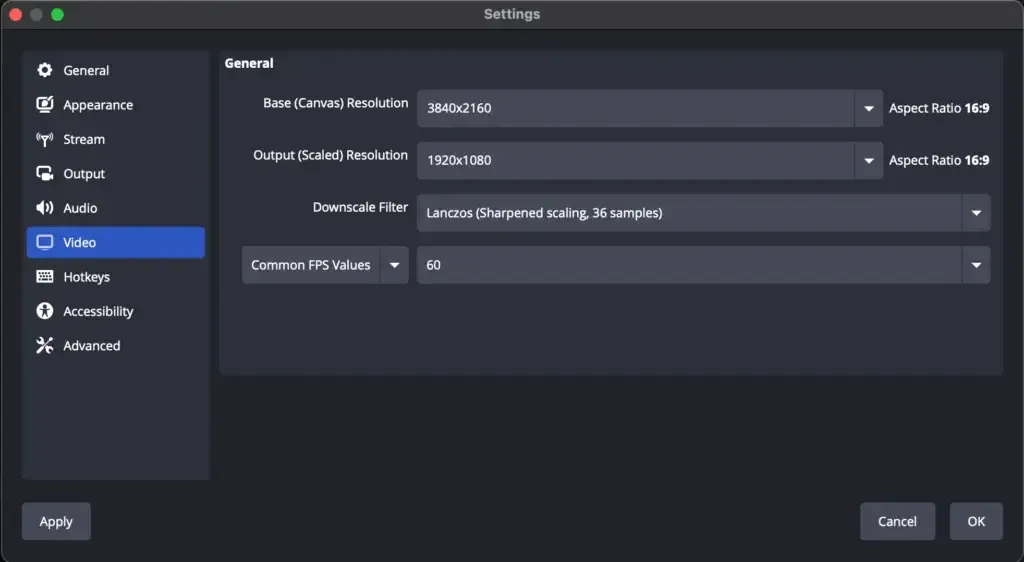
Base (Canvas) Resolution: Variable
Your Canvas should be the resolution at which you play your game, as long as that resolution is 16:9. If you have a PlayStation or an Xbox running on a 4K monitor, this should be 3840×2160. If you have a 4K monitor, but you play games on your Mac at 1080p, then set the Canvas to 1080p. Having the canvas match the source resolution means your PC doesn’t need to do any pre-scaling of the content. This can be made complicated when playing on an ultrawide monitor, but my guess is the Venn diagram of Mac users who game on ultrawide monitors has very little overlap.Output (Scaled) Resolution: Variable
Your output resolution is the maximum resolution you will stream or record at. If you plan to stream and record at 1080p, set this to 1920×1080.The important thing in this section is to limit how many times you are rescaling your output. My own settings are canvas and scaled are both 4K (3840×2160), and I do my scaling in the output tab. This allows me to record 4K video while streaming.
Rescaling is more efficient in the Video tab, so if you have the ability to scale in this window, that’s the best option.
Downscale Filter: Lanczos
Always Lanczos. The difference in performance between the three is barely noticeable, and the quality increase is definitely worth the trade off.Common FPS Values: 60 or 30
Keep it simple and avoid Fractional or Integer FPS for Twitch. Whether you set this to 60 or 30 FPS depends on a few factors. If your bandwidth is limited, streaming at 30 FPS requires far less upload bitrate than 60 fps. For 1080p content at 30 FPS, you can send 4500 bitrate and it will look great. 720p at 30 FPS can go down to 2500 bitrate without issue.If you play games with a lot of motion (shooters, fighting, racing, etc), 60 FPS is usually best to keep up with the action.
If you play slower games, like RPGs, strategy, or puzzle games, 30 FPS might be sufficient and allow you to run a less resource-intensive stream.
If I've missed anything, or OBS updates and adds new features, please don't hesitate to email me and let me know—I'll update this post as quickly as I can.
Ozject is an autistic content creator with a Bachelor of Fine Arts in Creative Writing and a Master of Business Administration. He streams on Twitch; produces videos for YouTube and TikTok; and writes blog content for other autistic content creators on the OzHole.